...
X2S Pro User Guide

Product Overview

X2S-Pro-Product-Overview
  1. Parking mode indicator
  2. micro SD card slot
  3. Reset
  4. Loudspeaker
  5. Working indicator
  6. MIC
  7. Mute button & Mute indicator
  8. Bracket
  9. Rear camera connection indicator
  10. Power port
  11. Rear camera working indicator
  12. Rear camera power cable

Pacakage Contents

X2S-Pro-Pacakage-Contents
  • Front Camera
  • Rear Camera
  • To rear camera
  • To front camera
  • Power Cable
  • Remote Snapshot Button
  • 3M Adhesive for Remote Snapshot Button
  • User Guide

Installation

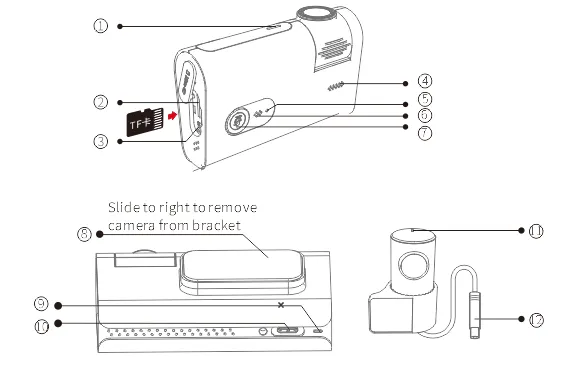
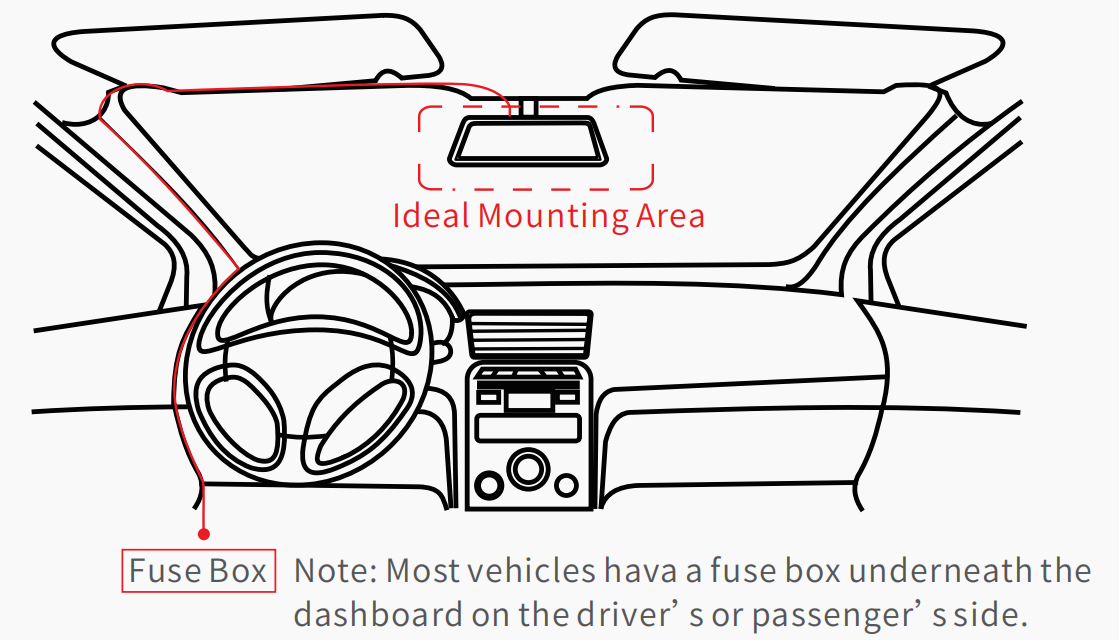
1.Connect the power cable to the fuse box, then install the front camera to the windshield behind the rear-view mirror. As shown in figure below.

X5 PRO Installation Step 1

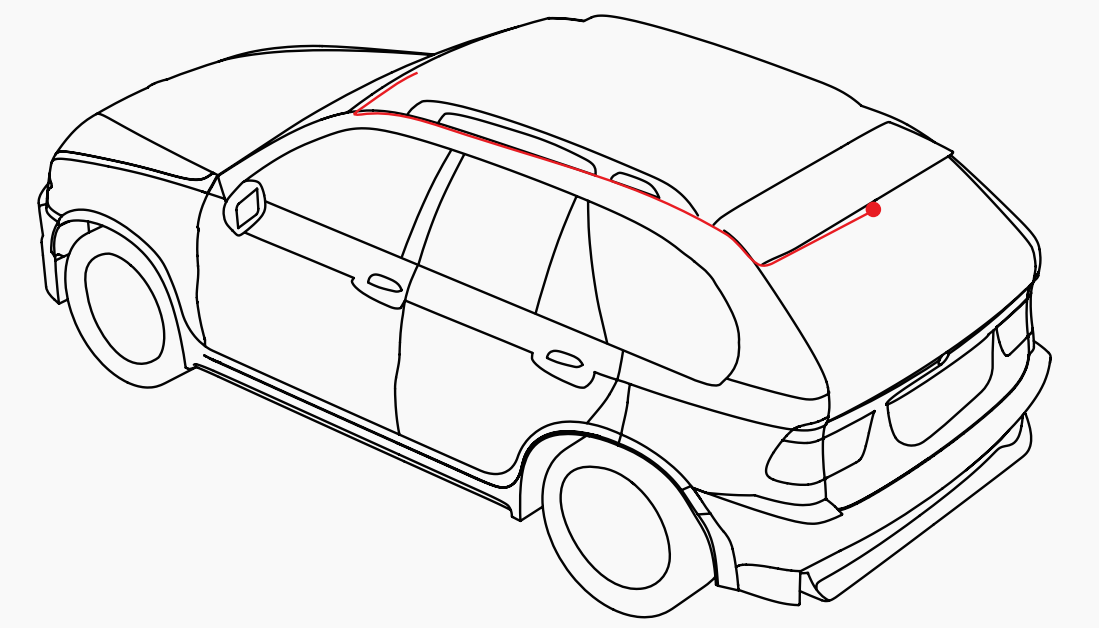
2.Install the rear camera. As shown in figure below.

X5 PRO Installation Step 2

Led Indicator Instruction

1.Working Indicator

  • Blinking slowly indicates the camera is in normal working mode.
  • Blinking quickly indicates there is a storage error.
  • Staying on indicates a camera failure.

2.Mute Indicator

  • Pressing the button will turn off the MIC, the indicator stays on and the camera stops recording audio.
  • Press the button again to turn on the MIC, the indicator turns off and the camera starts recording audio.

3.Parking Mode Indicator

  • Blinking slowly indicates the camera is in parking mode.
  • The indicator turns off when the camera is in exit parking mode.

4.Rear Camera Connection Indicator
Staying on indicates the front and rear camera are connected.

5.Rear Camera Working Indicator
Staying on indicates the camera is in normal working mode.

Install Ddpai App

For Android/iOS phones, search for “DDPAI” in the Google Play Store or Apple App Store. Download the App and install it on your phone.

App Instruction

On the Road

DDPAI users community, from here you can find nearby users, see the latest activities, user experience, installation tutorial etc.

X2S-Pro-On-the-Road

Camera

Add-Camera-for-ddpai-app
  • Local Album: You can View images, videos and emergency clips, you also can edit and share them from here.
  • APP Settings: Set the language, time format, App Storage Management, and so on.
  • FAQ: How to use the Dash Cam.
  • About DDPAI: Update firmware, contact us, information about the Dash Cam.

Pair Smart Phone to Dash Cam

  1. Launch DDPAI App, tap on camera, then tap on.
  2. Choose your DDPAI Dash Cam from the network list (For Android system, App will start to search Dash Cam network automatically. For iOS phone: turn on WLAN from “Settings ->WLAN”). The Dash Cam’s default SSID (or Wi-Fi name) is DDPAI_X2S Pro_XXXX.
  3. Enter the password (the default password is ‘1234567890’).
  4. Click ADD CAMERA, wait a few seconds until the preview screen show.

Preview/ Playback

Connect to Dash Cam via direct Wi-Fi, to see recent videos and real-time display.

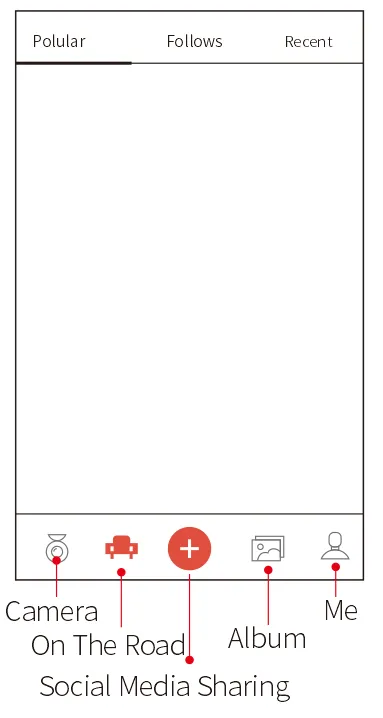
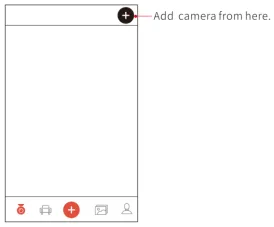
  1. Open the DDPAI App, and add your Dash Cam.
  2. Select Camera tab, then tap on the button, this will bring you to the preview page.

X2S PRO Preview

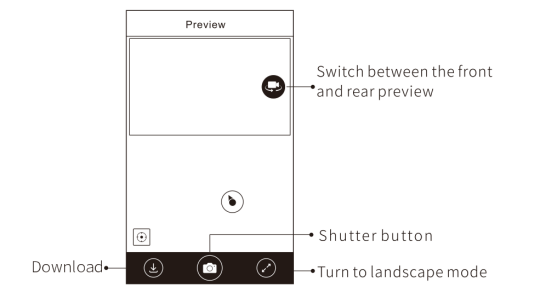
Rotate your smart phone or press expand icon, turn the preview screen to landscape mode.

X2S Pro Playback

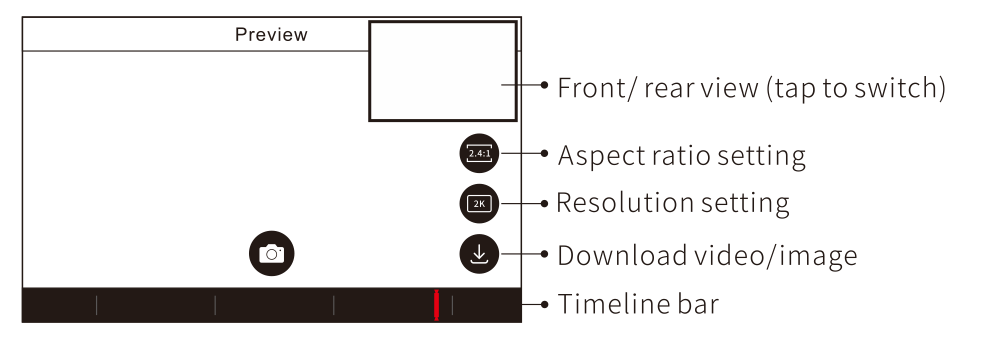
Playback: Tap and left/right drag time line bar at the screen bottom to create the starting point of the recording you wish to preview, then tap on thumbnail when you have made your selection, or wait for 5 sec for buffering, now you can watch the recording.

Download

Tap on from preview screen, you can select image or video to download.

Download image files:
Download manually by: Tapping on download image files from preview screen, will bring you to the download page, you can select or just simply tap on the images which you want to download.
The image files can be downloaded automatically by:
Going into “Me-> Settings”, turn on “Capture files auto download”.

Download video files:

  1. Select download video files from preview screen.
  2. Drag time line bar to create the starting point.
  3. Tap on download icon to start download.
  4. Tap on finish icon when you have made your selection.

Remote Snapshot

Pairing

  1. Pair the Remote Snapshot Button to your Dash Cam.
  2. Tap on Me->Settings->Camera Settings-> Advanced Setting, press Connect.
  3. Continuously press the snapshot button for 3~5 sec until a beep is heard.

Snapshot

Press once to take a photo, a clip can be taken by turning on Video with Snapshot (turn on/ off by: go into Me->Settings->Camera Settings-> Video with Snapshot).

Upgrade App And Firmware

Upgrade via APP: Tap on “Me-> About”, then tap on see more to view more information about your Dash Cam. If an update is available, a will appear. Tap on the New firmware available now to bring up the download page.

Upgrade via SD: Download the latest firmware for your camera, unzip and copy the content you have unzipped onto the SD card, then install the SD card back into the camera, power on the camera and it will apply the firmware automatically.

Specifications

  • Product Name: Dash Cam
  • Product Model: X2S Pro
  • Front Camera CPU: Quad HD H.264 video encoding processor
  • Front Camera Image Sensor: 4MP CMOS sensor
  • Front Camera Lens: 140° wide angle, F1.8
  • GPS: Build-in High precision GPS module, ceramic antenna, quick star searching, accurate positioning
  • Rear Camera CPU: Full HD 1080P
  • Rear Camera Image Sensor: HD CMOS sensor
  • Rear Camera Lens: 125° wide angle, F2.0
  • Wi-Fi: Build-in Wi-Fi, 2.4GHz
  • Storage: Class 10 micro SD card up to 128GB, loop recording
  • Video Output: Wireless video output, support Android/iOS device
  • G- Sensor: Built-in 3-axis accelerometer, motion locking, adjustable sensitivity via App
  • Image Resolution: front 2560X1440, rear 1920X1080
  • RAM: 1Gb

Fcc Statement

This device complies with Part 15 of the FCC Rules. Operation is subject to the following two conditions:
(1)This device may not cause harmful interference
(2)This device must accept any interference received, including interference that may cause undesired operation.

RF warning statement:
The device has been evaluated to meet general RF exposure requirement. The device can be used in portable exposure condition without restriction.
FCC Radiation Exposure Statement:
This equipment complies with FCC radiation exposure limits set forth for an uncontrolled environment. This equipment should be installed and operated with minimum distance 20cm between the radiator & your body.

Caution

The product’s optimal temperature range is 20°C – 75°C/-4°F – 167°F).
Install the device near the rear-view mirror to obtain the best open-field view. Do NOT install the Dash Cam in a location that will obstruct your required driving view.
The Dash Cam supports a class 10 micro SD card up to 128GB. Format the SD card before using, and format it regularly to maximize the lifetime of the memory card.
Do not use any cardboard, paper towel, or napkins to clean the lens.
Do not attempt to repair, dismantle, or modify the Dash Camera hardware by yourself.
Do not install the product in an environment with high humidity, or combustible gases or liquids.
Drawings for illustration purpose only. Actual product may vary due to product enhancement.

Customer Support

For customer support and firmware updates please visit www.en.ddpai.com.
You can also email a Customer Support expert at feedback@ddpai.com.

Scroll to Top