Skip to content
 a.On the Device screen of the DDpai App, tap Connect new device and enter the selection screen. Then tap Screen-less Dashcam.

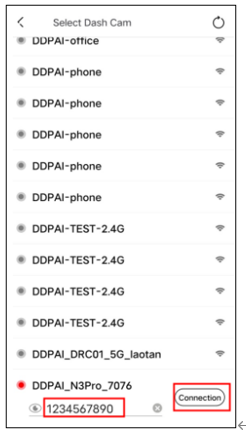
b.On the wizard screen, tap Next and Connect to Wi-Fi in sequence, and the detected dashcam Wi-Fi will be displayed (e.g., DDpai_N3 Pro_XXXX). then tap Connect.
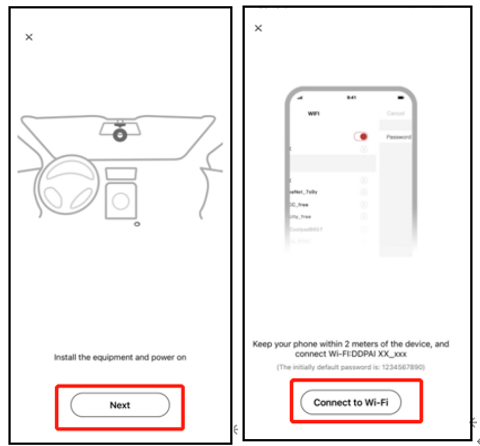
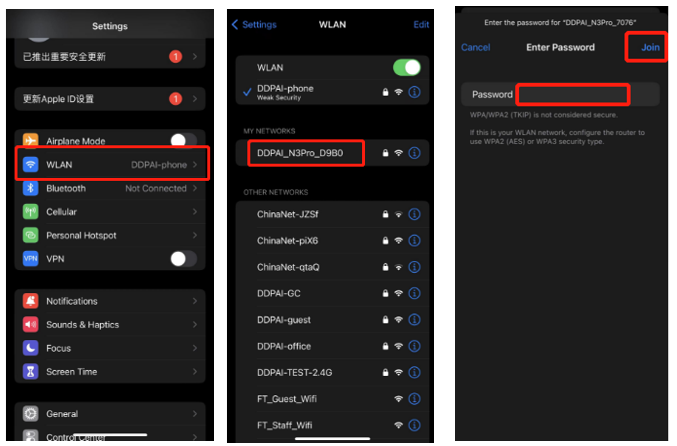
c.Connect your smartphone to the dashcam’s built-in Wi-Fi DDpai_N3 Pro_XXXX, with the default password: 1234567890.
-For iPhone: Find settings, select WLAN, and connect to the DDpai_N3 Pro_XXXX.
-For Android: Find Wi-Fi list, connect to the DDpai_N3 Pro_XXXX.
2、Once connected successfully, you will be taken directly to the real-time preview screen (Now & back) of the DDpai App for the dashcam.
When connecting the dashcam for the first time, the following prompts will appear:
-When prompted to modify Wi-Fi password: Please modify the password according to the actual situation, and keep the password safe after modification.
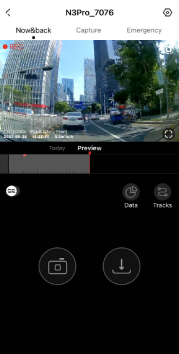
The home screen of DDPAI App (for the N3 Pro dashcam) is comprised of the following: three tabs of Now & back, Capture, and Emergency, setting icons and several function icons at the bottom of the screen, as shown below.
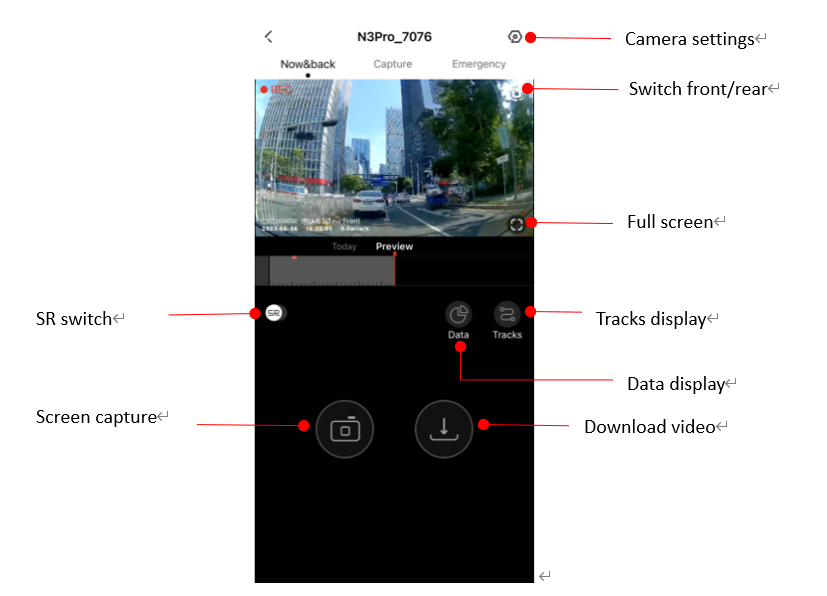
1.The front camera screen: After connecting the App to the dashcam, defaulting to portrait mode, it will enter the real-time preview screen.
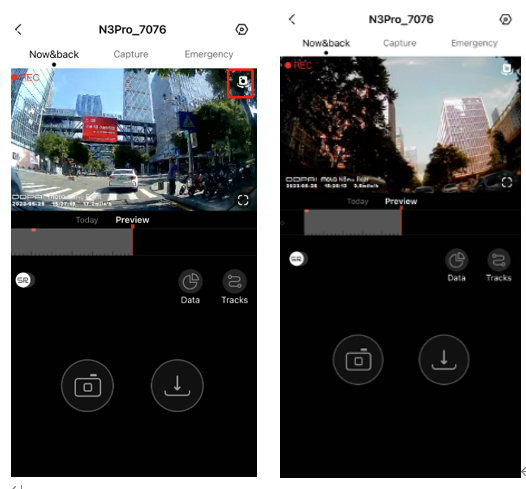
2.The rear camera screen: Tap the button![]() to switch between the front and rear camera preview screens.
to switch between the front and rear camera preview screens.
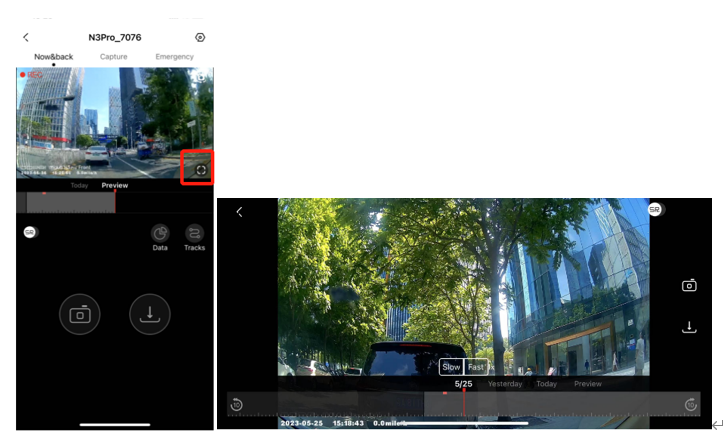
3.Full screen: Tap the button![]() or rotate your phone horizontally to switch the real-time screen to full-screen mode
or rotate your phone horizontally to switch the real-time screen to full-screen mode
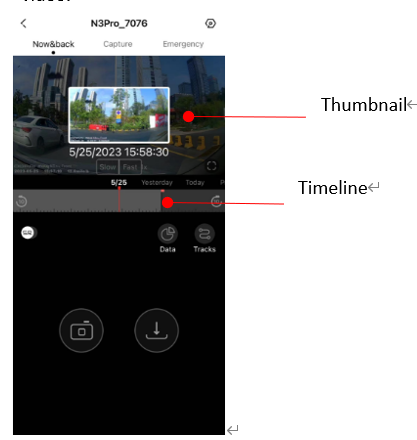
To check the playback video, drag the timeline at the bottom to view directly or select from the playback video list.
A.On the Monitoring Screen:
1.Drag the timeline forward or backward in the monitoring screen to view the video at a specific time.
2.Hold for 5s at a specific time (tap the thumbnail) to start playback of the previously recorded video.
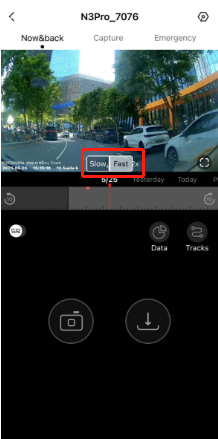
3.Adjust the playback speed:
Tap Speed down or Speed up to adjust the playback speed (0.5x, 1x, 2x) when sliding the timeline to view playback video.
4.Color tag of the playback timeline:
The time-lapse event is tagged in yellow, emergency event in red when sliding the timeline to view playback video, for convenient files finding.
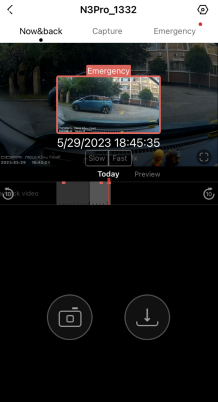
B. On the Emergency Tab:
It detects a collision or strong shake during recording, and captures related photos and video automatically.
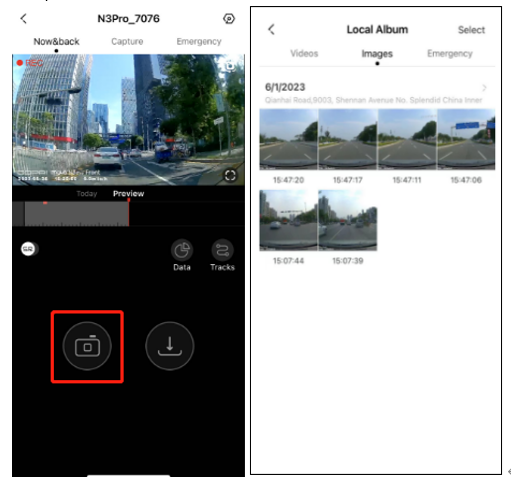
Tap the camera icon at the bottom of the monitoring screen to take a screenshot of the current screen, which can be saved to the local album.
The equipped SR function, allows the dashcam to superimpose driving data on the real-time preview/playback screen, creating an exclusive trajectory screen for your better visual and content sharing experience.
SR Effect in Real-time Video
1.See Connecting N3 Pro to the App to connect the DDpai App and the smartphone.
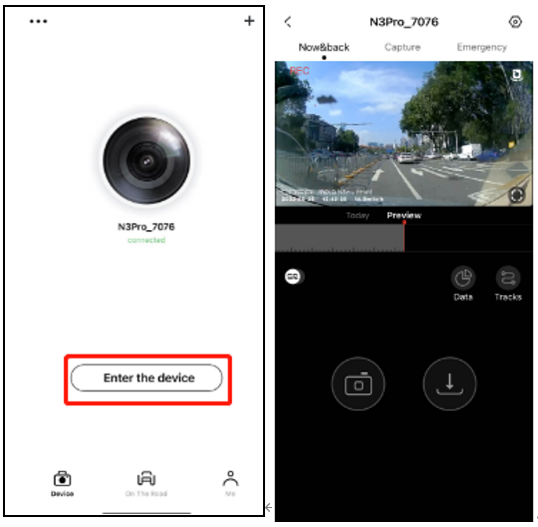
2.After connecting the DDpai App to the dashcam, open the App, tap Device > Enter the device, enter the Now & Back screen;
3.Find the SR switch at the bottom left of the preview screen, and check the real time SR effect.
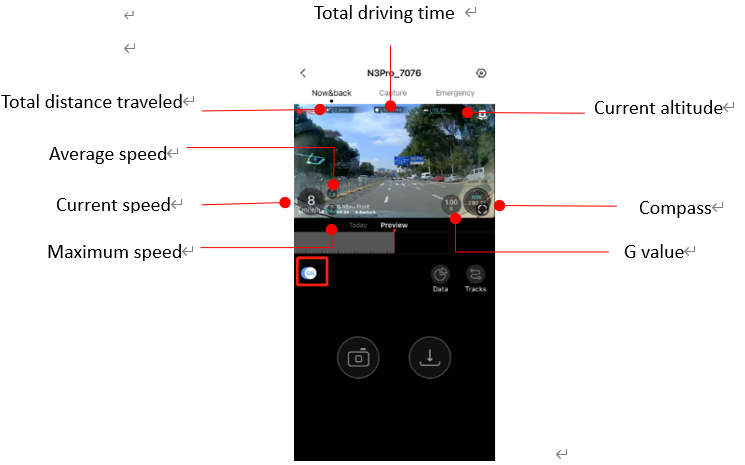
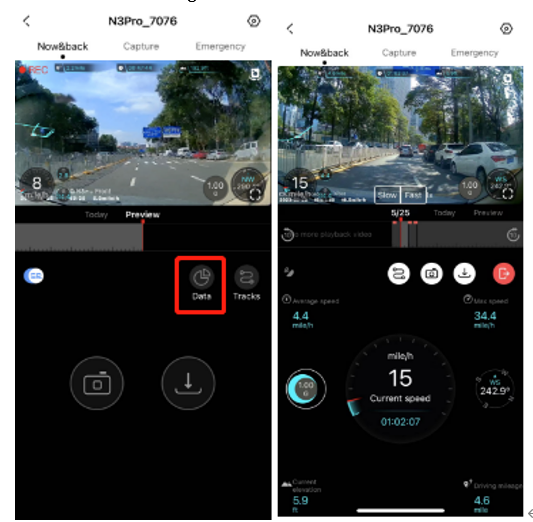
4.Tap Data at the bottom right of the preview screen to see the current speed, total driving time and other driving data.
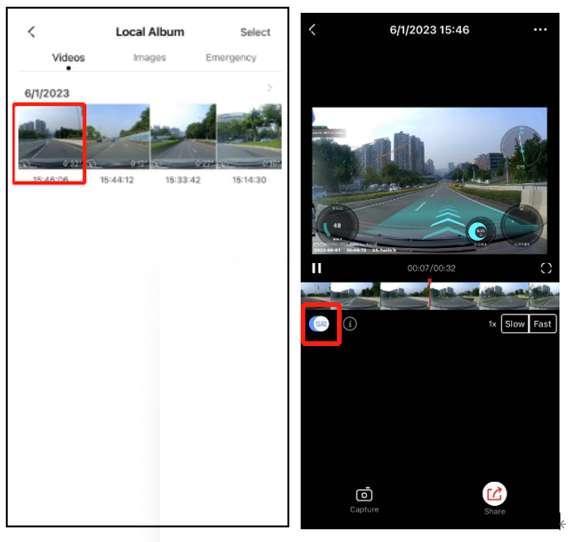
SR Effect on Downloaded Video
Find the videos through Me > Local Album > Videos and open the details, open the SR switch to check the downloaded SR effect.
Track Management
The dashcam supports the synchronization of driving tracks on DDpai App, recording the vehicle driving status.
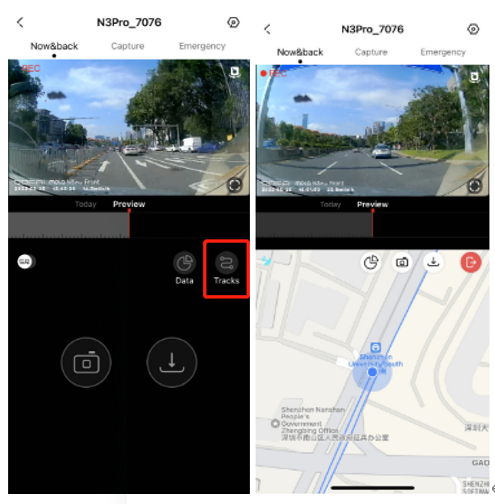
Viewing Real Time Driving Tracks and Current Location
1.See Connecting N3 Pro to the App to connect the DDpai App and the dashcam.
2.After connecting the DDpai App to the dashcam, open the App, tap Device > Enter the device, enter the Now & Back screen;
3.Tap Tracks at the bottom of the Now & Back screen, then you can check the real time driving tracks and current location.
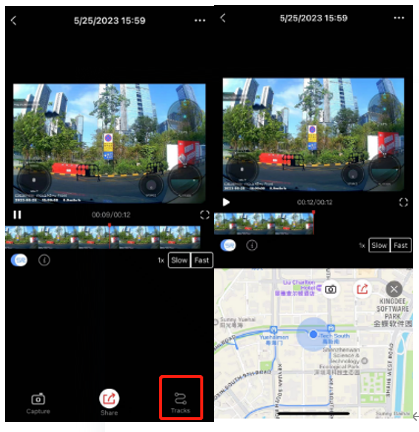
4.If you have captured part of a video and downloaded it, the video should be displayed with driving tracks. To view the tracks, open the App and select Me > Local Album. Then choose the video, tap Tracks at the bottom of the screen, and driving tracks will be displayed below.
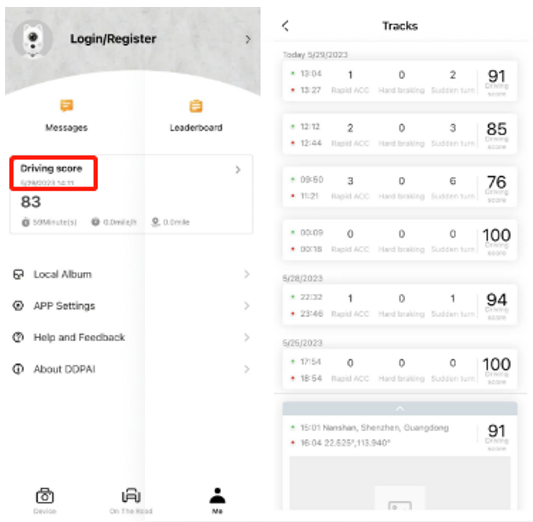
Viewing Driving Tracks
Find the DDpai App home screen and select Me > Driving scores to view all driving track records.
You can not only take photos on the APP, but also download these photos and videos directly to the smartphone, avoiding dismantling the TF memory card on the N3 Pro many times.
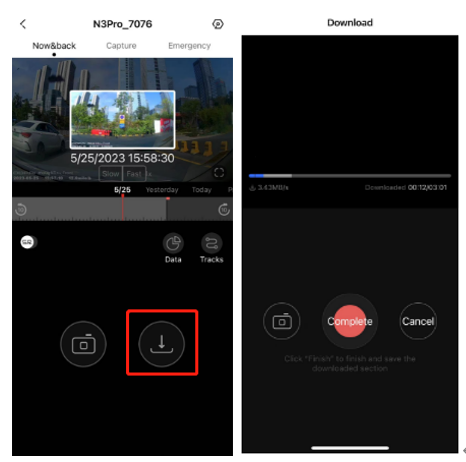
Downloading from the Playback Timeline
1.Slide left or right on the timeline on the monitoring screen to select the starting point to download.

2.Tap the download button![]() to enter the timeline download screen, and the App will start downloading automatically. After downloading the video segment, tap Complete to finish downloading.
to enter the timeline download screen, and the App will start downloading automatically. After downloading the video segment, tap Complete to finish downloading.
After downloading, the file will be saved to the local album and can be shared or deleted.
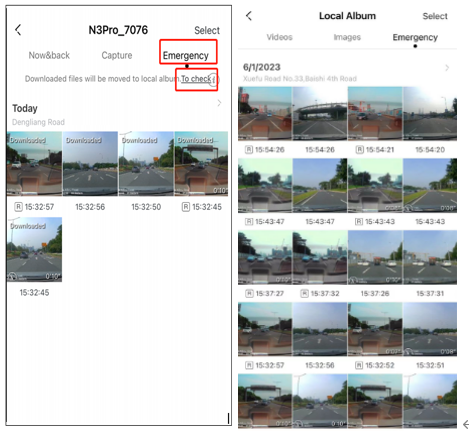
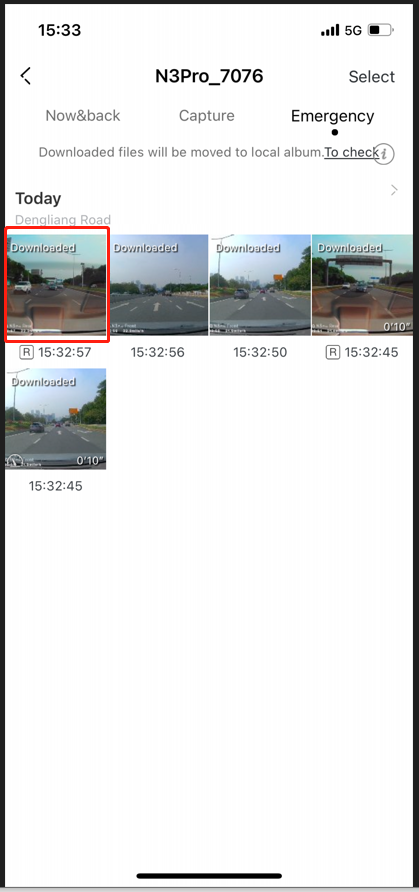
Downloading from the “Emergency” Files
Long-press the file in the list to enter the selection state, and then select files to download.
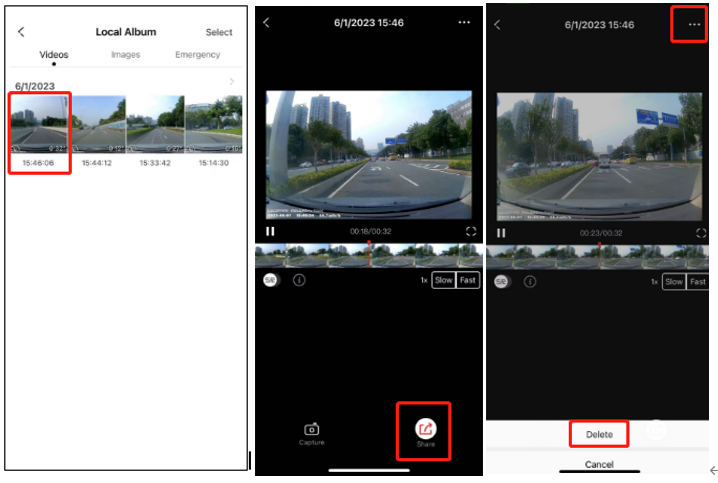
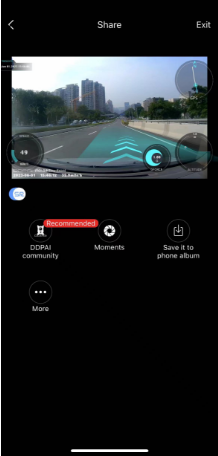
1.In the Video, Image, or Emergency tab, select a video (or image), and then tap the icon![]() at the bottom to share the video to your social media account.
at the bottom to share the video to your social media account.

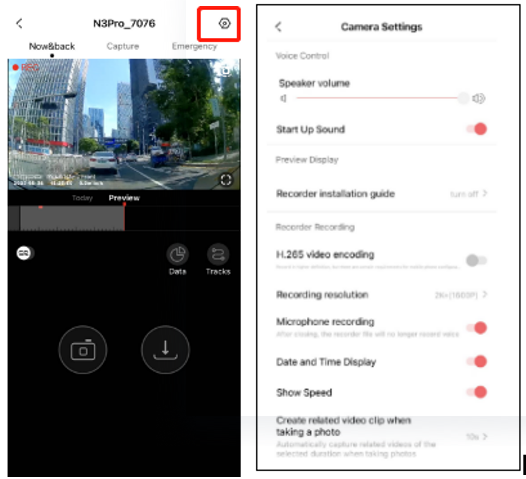
On the real-time monitoring screen of the DDpai App,tap the settings icon![]() to enter the camera screen settings , where you can set various parameters of the dashcam.
to enter the camera screen settings , where you can set various parameters of the dashcam.
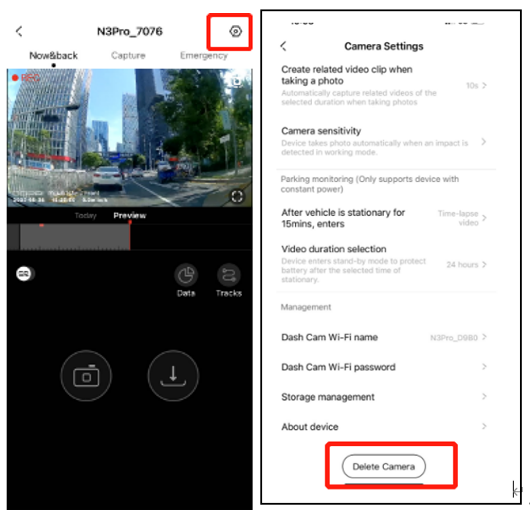
Delete the daschcam from the list if you stop using it. Re-add the daschcam when you use next time to make new connection.
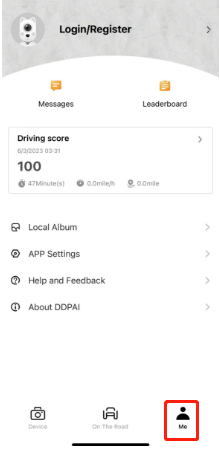
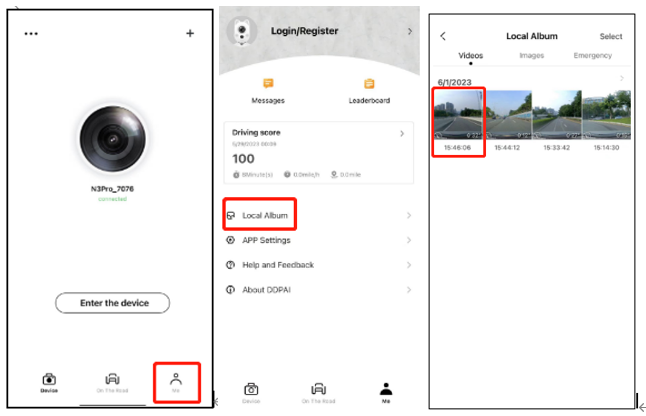
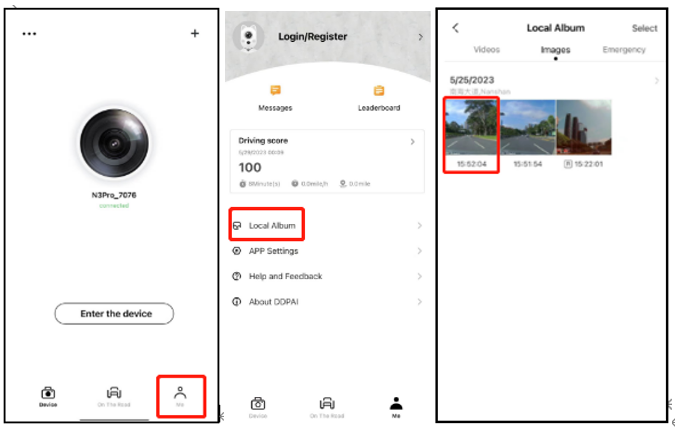
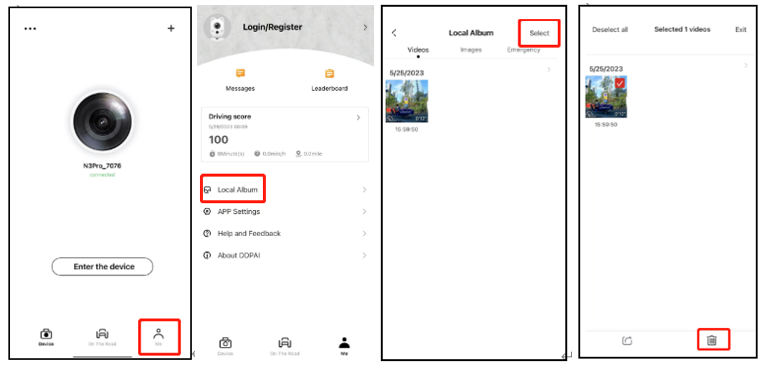
Open the DDpai App, tap Me in the lower right corner, enter the user center screen. Here you can set up the local album and the app, view the help and feedback and the application information of DDpai App.
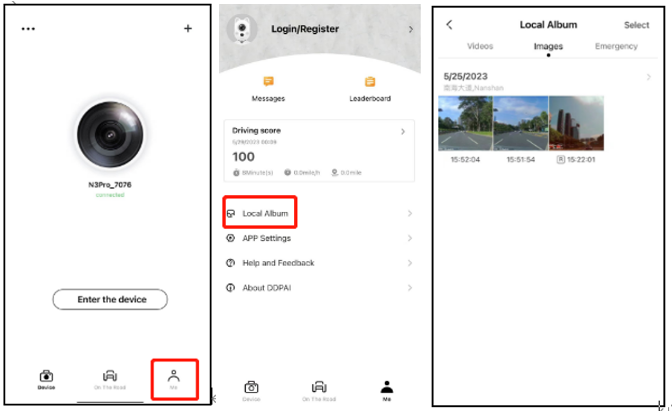
The local album is the storage of DDpai App in your phone, where you can save videos, snapshots, and emergency downloaded from DDpai App.
Tap Me > Local Albums, then enter the local album as shown in the pictures below.
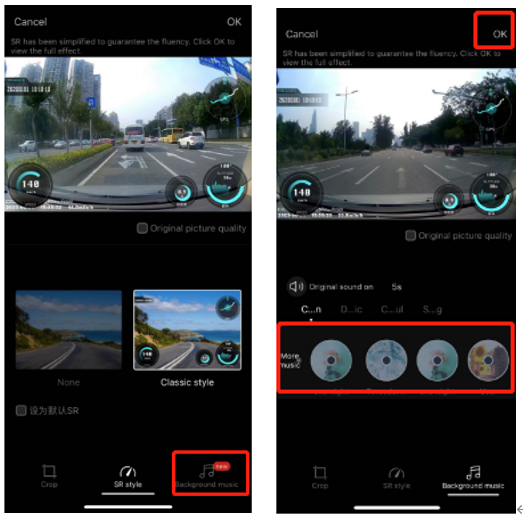
The videos in the local album support user-defined editing, such as adding background music and previewing. Here are the editing steps:
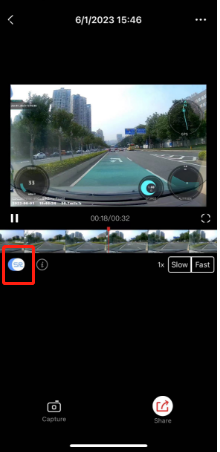
- Tap Me > Local Albums > Videos to enter the video screen. Tap the video that needs to be shared to enter the Video Details.
- Turn on the SR switch in the lower left corner of the screen to superimpose SR data on the video.
- Tap Share in the lower right corner, and enter the Crop screen. Drag the timeline left and right to crop the video.
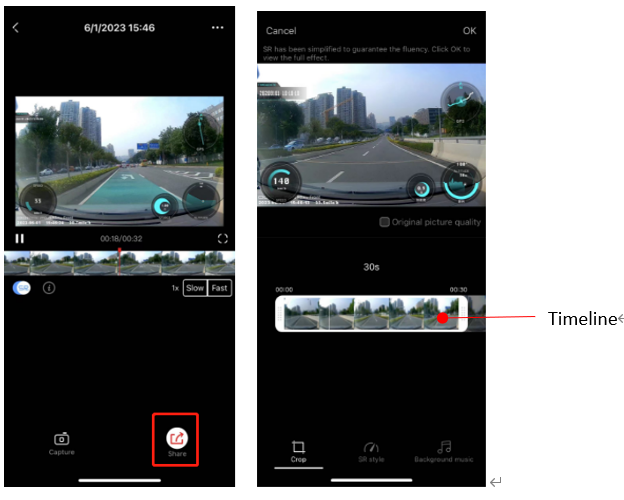
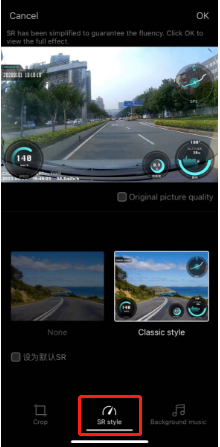
- Tap SR Style, two SR styles are ready to choose: Classic Style will superimpose real-time speed, front vehicle distance, and other driving data, as well as turning, acceleration, and other signs; None allows you to choose the SR style according to your preference.
- Select Background Music, here you can customize the background music. Then tap OK in the upper right corner to complete the video editing.
Note: Tap More Music on the Background Music screen, you can choose system music, import music from your local storage, or extract video music from your phone album for mixing.
- You can share, save to the local alum on the sharing screen after editing the video.
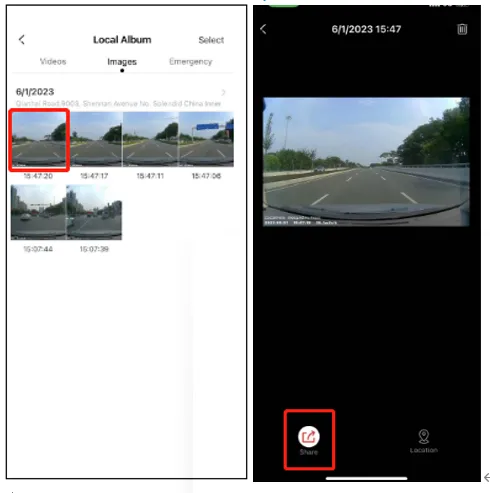
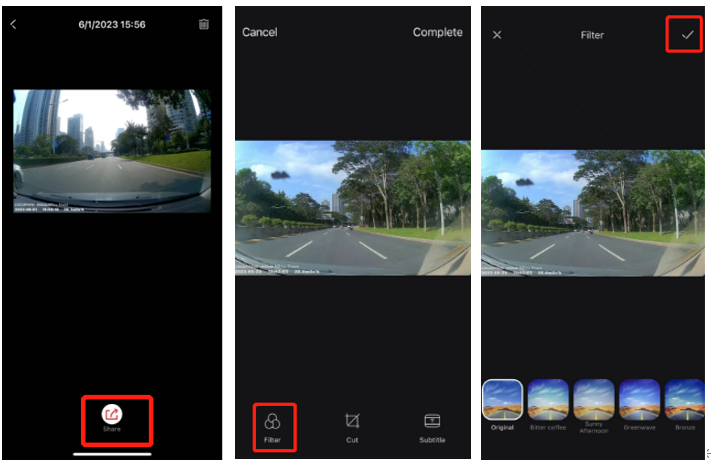
The images in the local album support user-defined editing, such as adding filters and text, previewing, and cropping. Here are the editing steps:
- Tap Me > Local Albums > Images, enter the images screen. Tap an image to openthe sharing screen.
- Tap Share, enter the Edit screen. Tap Filter to select a suitable filter from the list, and tap √ in the upper right corner to apply.
- Tap Crop to customize the image by dragging the nine-square grid (you can also select a fixed cropping method), and tap √ in the upper right corner to confirm the cropping.

- Tap Subtitle, enter the corresponding text in the input box, drag the AA bar left and right to modify the text size, and tap √ in the upper right corner, then you can add text effects to the image.
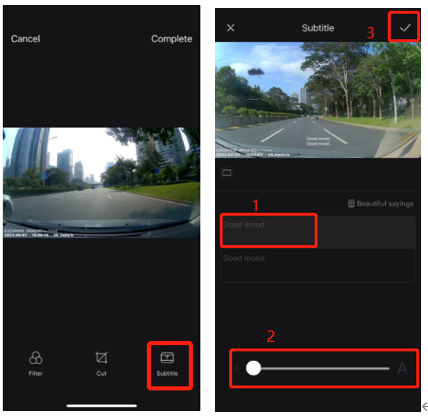
- Tap Complete in the upper right corner to complete the image editing.
- You can share, save to the local alum on the sharing screen after editing the images.

Tap Me > Local Albums, In the local album, Tap Select or press and hold the video/image to check the videos/images you want to delete. Tap the delete button in the lower right corner to delete.
Tap Me > App Settings, enter the App settings as shown in the picture below.
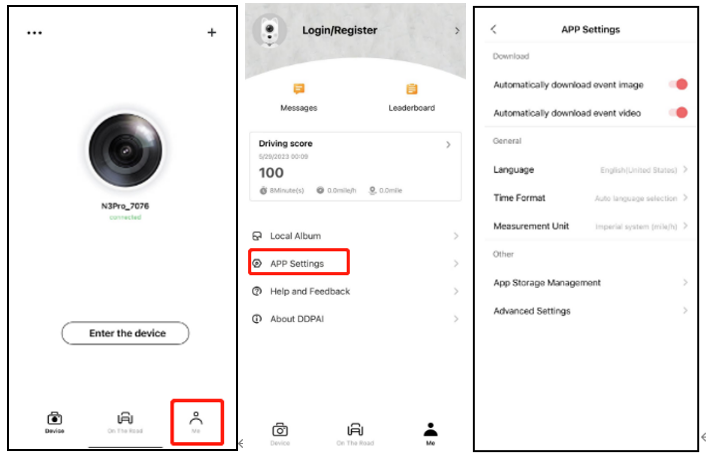
Download:
- Auto-downloading the emergency images: Once connected, it will automatically download images taken during emergency while driving. This is enabled by default, and downloaded images will be automatically synced to the local album.
- Auto-downloading the emergency videos: Once connected, it will automatically download emergency videos while driving.
General:
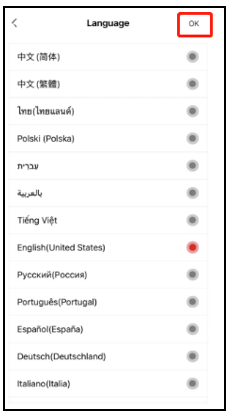
- Language: Set the language for the DDpai App.
- Time format: Set the time format for the timestamp displayed in videos.
The app automatically retrieves the smartphone’s time and language settings.
The dashcam’s time will be automatically synced after connecting to the app. - Offline maps: Map data downloaded in advance to the App.
Other:
- APP storage management:
View the storage space and usage frequency of the dashcam. Tap Format to format the SD memory card.
DDpai App defaults to the English screen, if you do not need to modify it, skip this section.
- Open DDpai App, tap Me in the lower right corner, and enter the APP user login screen;

- Tap App Settings to enter the App settings screen, and then tap Language to enter the language modification screen.
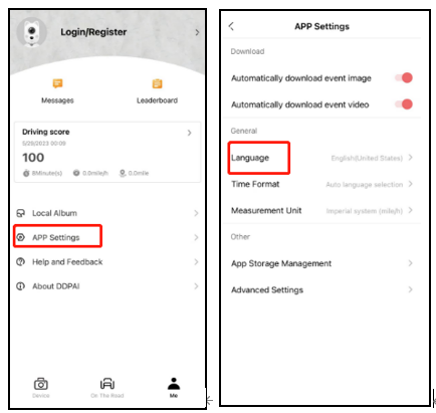
- Tap on the language you want to use.
- Return to the App Settings screen, and then tap Time Format to enter the time format setting screen.
- Tap the time format you want to use.
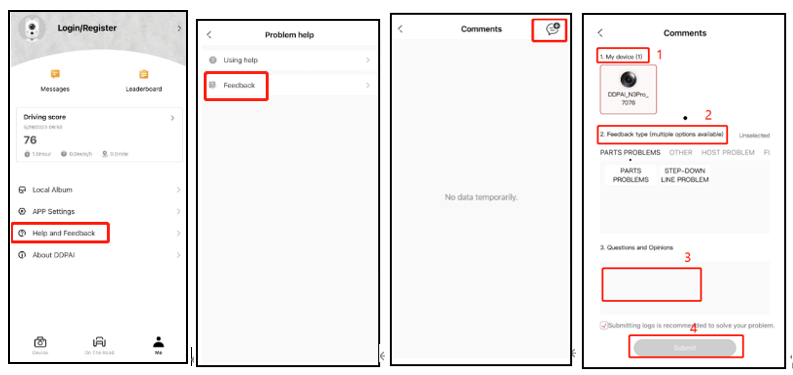
Tap Me > App Settings > Advanced Settings, in turn, tap the switch, and turn on the bug reporting mode.
- Tap Me > App Settings > Advanced Settings, in turn, tap the switch, and turn on the bug reporting mode.
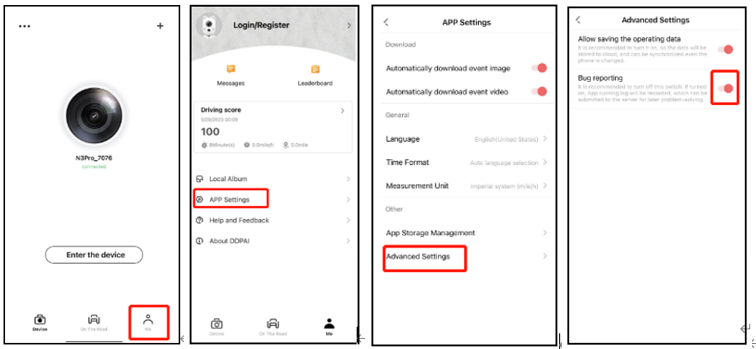
- Return to the Me user center, tap Help and Feedback, enter the Problem help screen, tap the button in the upper right corner of the screen, select the device to fill in the detailed questions, and tap Submit to finish submitting.